Alternative Uses for Terrain2
Create interesting effects by careful customisation of the terrain image file for mountains, hills and rivers.
by Kobayashi (February 2001)
Introduction |
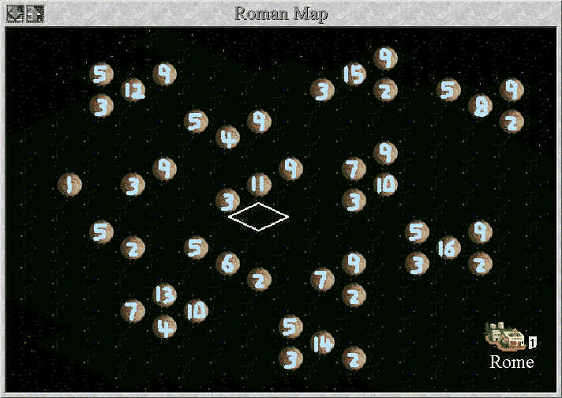
This is a short article about using the mountain and hill types of terrain to generate additional graphics for your scenario. This technique is particularly useful when you want to add pictures (like your signature) which have no effect on the game other than their visual impact. For ease of reference, I have labeled the mountain icons from 1 to 16 as shown here. (The same process applies to hills but I will only use mountains in my article from now on).
How the Mountain Icons are Chosen |
These icons can be found in the terrain 2 file. The next picture shows the 'mountains' placed on a mountain base filter consisting of a brown circle. The mountain base filter may be found in the terrain 1 file. This picture shows which of the 16 mountain icons are used depending on whether there are other mountain squares in diagonally adjacent squares. Note that mountain squares on top, below or to the left and right have no impact on which icons are used.
Although it should be pretty apparent how the system works, I'll go through in text, how the mountain icons are chosen. The way the mountain icons combine can be divided into three groups.
Simple Combinations
- Mountain icon 1 appears when there are no adjacent mountains
- Mountain icon 2 appears when there is a mountain square to the top left
- Mountain icon 3 appears when there is a mountain square to the top right
- Mountain icon 5 appears when there is a mountain square to the bottom left
- Mountain icon 9 appears when there is a mountain square to the bottom left
Complex Combinations
- Mountain icon 4 : One mountain square to the top left and one mountain square to the top right
- Mountain icon 6 : One mountain square to the top left and one mountain square to the bottom right
- Mountain icon 7 : One mountain square to the top right and one mountain square to the bottom right
- Mountain icon 10 : One mountain square to the top left and one mountain square to the bottom left
- Mountain icon 11: One mountain square to the top right and one mountain square to the bottom left
- Mountain icon 13 : One mountain square to the bottom left and one mountain square to the bottom right
Very Complex Combinations
- Mountain icon 8 : One mountain square to the top right, one mountain square to the bottom right and one mountain square to the top left
- Mountain icon 12 : One mountain square to the top right, one mountain square to the bottom left and one mountain square to the top left
- Mountain icon 14 : One mountain square to the top left, one mountain square to the bottom left and one mountain square to the bottom right
- Mountain icon 15 : One mountain square to the top right, one mountain square to the bottom left and one mountain square to the bottom right
- Mountain icon 16 : Mountain squares all round.
Obvious, Non-overlapping Sets |
Given the way, the icons are used, you can't use all the icons at the same time as they may appear in more than one situation. I have put some different sets of mountain icons which you can put together without co-interference. Please note that is possible to make certain icons blank. For instance, if you are using set one, you can use icon 3 as a single icon by erasing the picture for icon 9. The mountain square must still be on the map but it will show only the base filter for that square.
Set One
- 1
- 3,9
- 2,5
- 4,10,13,17
Set Two
- 1
- 3,9,11
- 5,6,2
- 4,10,13,17
Set Three
- 1
- 4,10,13,17
- 2,3,5,9,16
Set Four
- 1
- 2,7,9
- 3,5,12
- 4,10,13,17
How to make graphics for multiple squares |
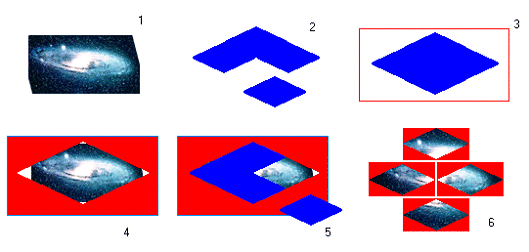
It is quite hard to describe the process using words so you'll have to read the explanation in conjunction with this sequence of pictures below. I'll assume we are using the paint program that comes with windows for simplicity. I'll also assume that we are doing a 4,10,13,17 combination.
- First you get the right picture and resize it to fit four squares.
- Then you start with the mold. Begin a blank bmp file by running the paint program. Take one terrain diamond and repeatedly copy and paste it until you have formed a bigger diamond. The terrain diamond from the terrain files all contain one extra bit on the left and right which makes them not fit together snugly. You must trim these off first.
- Then draw an empty box around the bigger diamond and fill in the square with red. The fill in the diamond with white.
- Next copy the entire mold (making sure that you have set the background color to white) and paste it over the picture you are using (use the do not paste background color option). If you have done this properly, you should have framed your picture with a big diamond.
- Now save the file but keep it open and start a second file. Paste in three of the four small diamonds, make them the same color as the mold. Cut the remaining portion and paste it to the second file. Close the original file without saving and then reopen it. Now repeat the process but pate in the small diamonds in a different sequence.
- When you are finally done, you should have four separate terrain diamonds. Put them in the right position in the terrain 2 file.
Editor's Note |

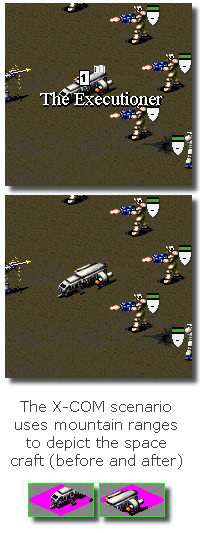
A good example of this approach can also be seen in the official Microprose 'X-COM' scenario that came with the Fantastic Worlds add-on.
The use of two connecting mountain terrain tiles running north-east to south-west was used to create the impression of a space shuttle. The south-western tile was used as the city-square, that if destroyed by the Aliens, would become desolate terrain (see image of 'The Executioner' as an occupied 'city' and after destruction).
The use of Terrain2.gif was used judiciously in this scenario to create similar effects for the Alien bases and other connected terrain effects.


